

Wedding photography is at once an exciting and challenging genre. From bridal prep to the first look, the ceremony, couples portraits and receptions, weddings cover a lot of ground. If you’re not on top of your game, you can quickly fall behind. The fast pace in which wedding photographers work can make it difficult to stay creative as well, especially when reality and ideal timelines go their separate ways. Still, expectations run high for these (ideally) once-in-a-lifetime events, and missed moments do not come with do-overs. Fortunately, there are tips and tools you can use to minimize the stress so that you can focus on capturing all of the important moments that make wedding days so special.
We’ve put together six wedding photography tips to help get through your next wedding and deliver creative, meaningful wedding photographs, despite whatever challenges arise.
Camera bags for wedding photographers | backpack | roller | shoulder | modular | adventure
Tip 1 - Cover 3 Basic Storytelling Angles
Watch any movies or television shows and you’ll find a common thread in their basic approach to visual storytelling. Regardless of the subject matter, they all incorporate the same storytelling angles: wide, medium, and tight (close-up).
- Wide angles set the scene and establish the location.
- Medium angles bring us in closer to identify subjects within a scene.
- Tight angles (or close-up shots) reveal details about our subjects and place us directly in the action.
You can (and should) use this same concept to photograph weddings. If you’re running short on creative ideas, start with the basics and cover all of the angles. To illustrate this point, look at the photos below.

During the bride’s entrance to the ceremony, we have a medium-wide shot of the bride walking down the aisle with her mother. Next, we see an over-the-shoulder medium shot of the groom’s reaction to the bride’s entrance. Finally, we see a close-up of the bride and her mother holding hands as they approach the mandap (altar). Use this approach as a guide to document unfolding events; then, consider some of the following tips to enhance this storytelling technique.
Tip 2 - Use Lenses for Creative Effect (Compression vs Distortion)
As you’re well aware, camera lenses come in a wide range of focal lengths. Prime (or fixed focal length) lenses tend to feature wider apertures to capture that dreamy bokeh while zoom lenses offer convenience in their coverage of multiple focal lengths, such as 24-70mm or 70-200mm, and so on. What may surprise you, however, is how each of these lenses can be used for effect to add another layer of creativity to the images you capture.
Here are two ways to use lens creatively for effect:
Compression

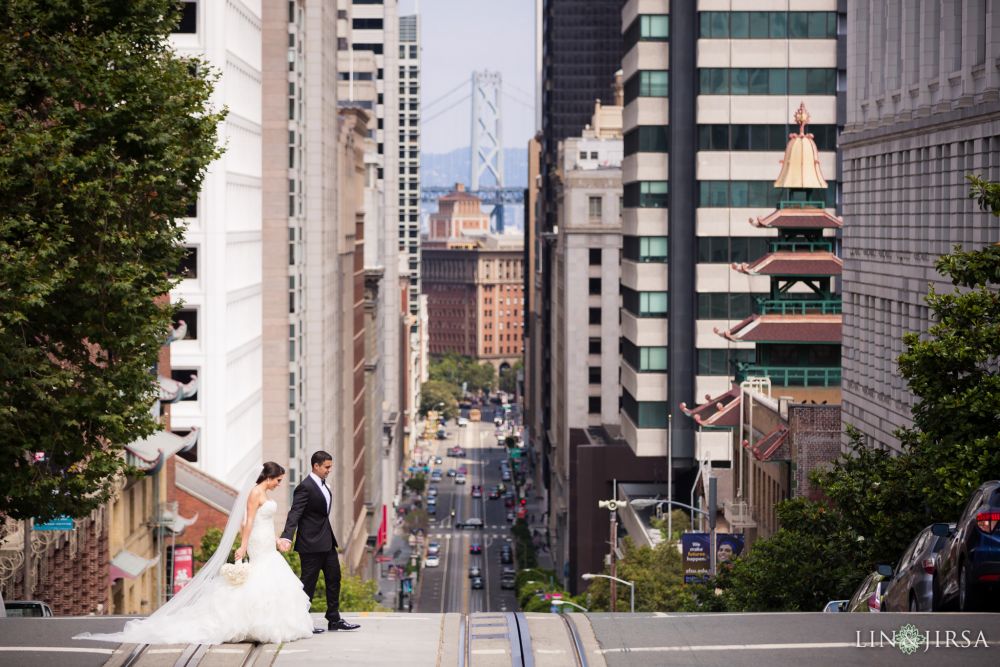
Lens compression is a phenomenon in which the background appears to be closer to a subject and larger in comparison than it actually is. This compressed effect is achieved with telephoto lenses. With a longer lens, you have to step farther back from the subject in order to keep them the same size in the frame. The farther away you move from your subject, the larger and closer the background will appear. See how the tree appears larger in the image above on the right.

If you want to highlight the location or the background, you can use a telephoto lens to make it more prominent in the image, as you can see in the images above of the city skyline in downtown Los Angeles. The image on the left features a wider focal length and the image on the right is zoomed in to really make the buildings appear closer to the couple.
Distortion

Image by Lin & Jirsa Photography
Lens distortion is a common effect found in photos captured with wide angle lenses, which include any focal length up to 50mm. The wider the focal length, the more exaggerated the distortion. Unlike telephoto lenses, wide angle lenses yield minimal compression and tend to distort the shape of the objects along the edges of the frame. This can be used for creative effect if you want to envelop your subjects with surrounding architecture (see the image above). Be sure to keep your subjects toward the center of the frame for wider shots, however, as they can be stretched and bent (otherwise distorted) if placed along the edges.
Pro Tip: When carrying around multiple lenses, you need a solution that allows you to move and access your gear quickly without weighing you down. Wedding days can run long and you don’t want to have to carry your entire arsenal gear around a location. Choose your top 2-3 lenses and pack them into a comfortable shoulder bag with an easy-open flap for swapping lenses.
Tip 3 - Find Foreground Elements to Shoot Through
One way to add creativity to an image and make it stand apart from a simple point-and-shoot portrait is to find foreground elements to shoot through. Common objects include trees, doorways, and even other people. Using foreground elements adds depth to imagery and works to draw the focus to your tack-sharp subjects.

Image by Lin & Jirsa Photography
Due to the voyeuristic nature of shoot-through images, it’s important to note that the subjects should avoid making eye contact with the camera. Otherwise, it creates an awkward vibe, as if the viewer were caught peeping at the subjects in the photo. The moment should appear private and uninterrupted.
Tip 4 - Make Micro-Posing Adjustments
Considering the time it takes to pick a spot, set up a pose, dial in the lighting, and capture a shot, it makes sense to make micro-adjustments to the pose and capture a variety of images from the same setup. Here are five foundation poses from which you can make micro-adjustments:

Now, here are some basic micro-adjustments that you can make:
- Expressions: As a photographer, you need to get your subjects to emote and then capture that moment. You can do that by giving different cues (such as “Hug her like you haven’t seen her in 5 years) and directing your subjects into natural expressions.
- Eye direction: With couples, you can have the first subject look at you while the second subject looks at the first subject, have them both look at you, have them look at each other, have the first subject look at the second subject while the second subject looks down and away, etc.
- Hand placement: A subject’s hands can draw a lot of attention in a photo, so they should be carefully placed. That said, subjects can hold hands, hug onto one another, and so on. Placing hands on a subject’s belly, however, can make it look like a maternity shoot, so reserve that hand placement for its intended purpose.
- Touchpoints/posing: The more touchpoints (or points of contact) there are between your subjects, the more romantic an image will feel, especially if one of those touchpoints is kissing. Some of the foundation poses illustrated above lend themselves to creating more touchpoints. You can switch between the foundation poses illustrated above for a variety of portraits.
- Focal length/angle: Changing your perspective can change an image entirely, so consider shooting from different angles with different focal lengths. Remember the effects of lens compression and distortion discussed above and use it creatively.
Tip 5 - Incorporate Off-Camera Flash

A lot of photographers, especially newer photographers, tend to shy away from using off-camera flash. Lighting gear is less cost prohibitive than it used to be, and technology has advanced enough to make it easier to use with built-in radio frequencies, but the burden of learning the characteristics of lighting as well as techniques to manipulate it still fall on the photographer’s shoulders. The results from a creatively lit image, however, make it all worth it.
Off-camera flash goes beyond what the eye can see to open a world of possibilities, one you have to see through the use of flash to believe. If you’re running out of creative ideas in ambient light, give off-camera flash a try. Be sure to practice your lighting techniques before the wedding day, however, as you want to avoid fumbling around with the lighting gear while your couple stands idly by, wondering what the rest of the wedding party is doing.
Tip 6 - Shoot for the Edit
Post-production makes up a significant portion of the photographic process, and it can be used to bring your creative vision to life. Familiarize yourself with various editing techniques, and then shoot for the purpose of editing your image a certain way.

For example, in the image above, the in-camera file (on the left) is underexposed, but the details have been retained so that an HDR preset from the Visual Flow Presets could be used in post to lift the shadows and save the highlights. If this image had been exposed for the subjects’ skin, we would have lost the details in the clouds, and this dramatic portrait would have a more bright and airy look to it.
The decisions you make in post rely heavily on the decisions you make in-camera, so think ahead and let your understanding of post-production allow you to shoot more creatively.
Conclusion
We hope you found these six wedding photography tips for being creative under pressure helpful. Here’s a quick recap of the tips we covered above:
- Cover 3 Basic Storytelling Angles (Wide, Medium, and Tight)
- Use Lenses for Effect (Compression vs. Distortion)
- Find Foreground Objects to Shoot Through
- Make Micro-Posing Adjustments
As Maya Angelou once said, “You can’t use up creativity. The more you use, the more you have.” Incorporate these tips into your shooting workflow, practice, practice, practice, and then watch your creativity grow. Be sure to visit SLR Lounge for more great wedding photography tips and tutorials.